Introduction
In this tutorial, we'll walk through the development of a Python project that leverages a graphical user interface (GUI) to perform various tasks. The project encompasses a wide range of functionalities, including opening software, task tracking, messaging, camera operations, AWS services integration, and more.
Tkinter is a standard GUI (Graphical User Interface) toolkit in Python. It comes pre-installed with Python, making it a convenient choice for creating user interfaces. Tkinter provides a set of tools and widgets to build interactive and visually appealing applications.
Let's dive into the details of setting up the development environment and creating the main window.
Project Overview
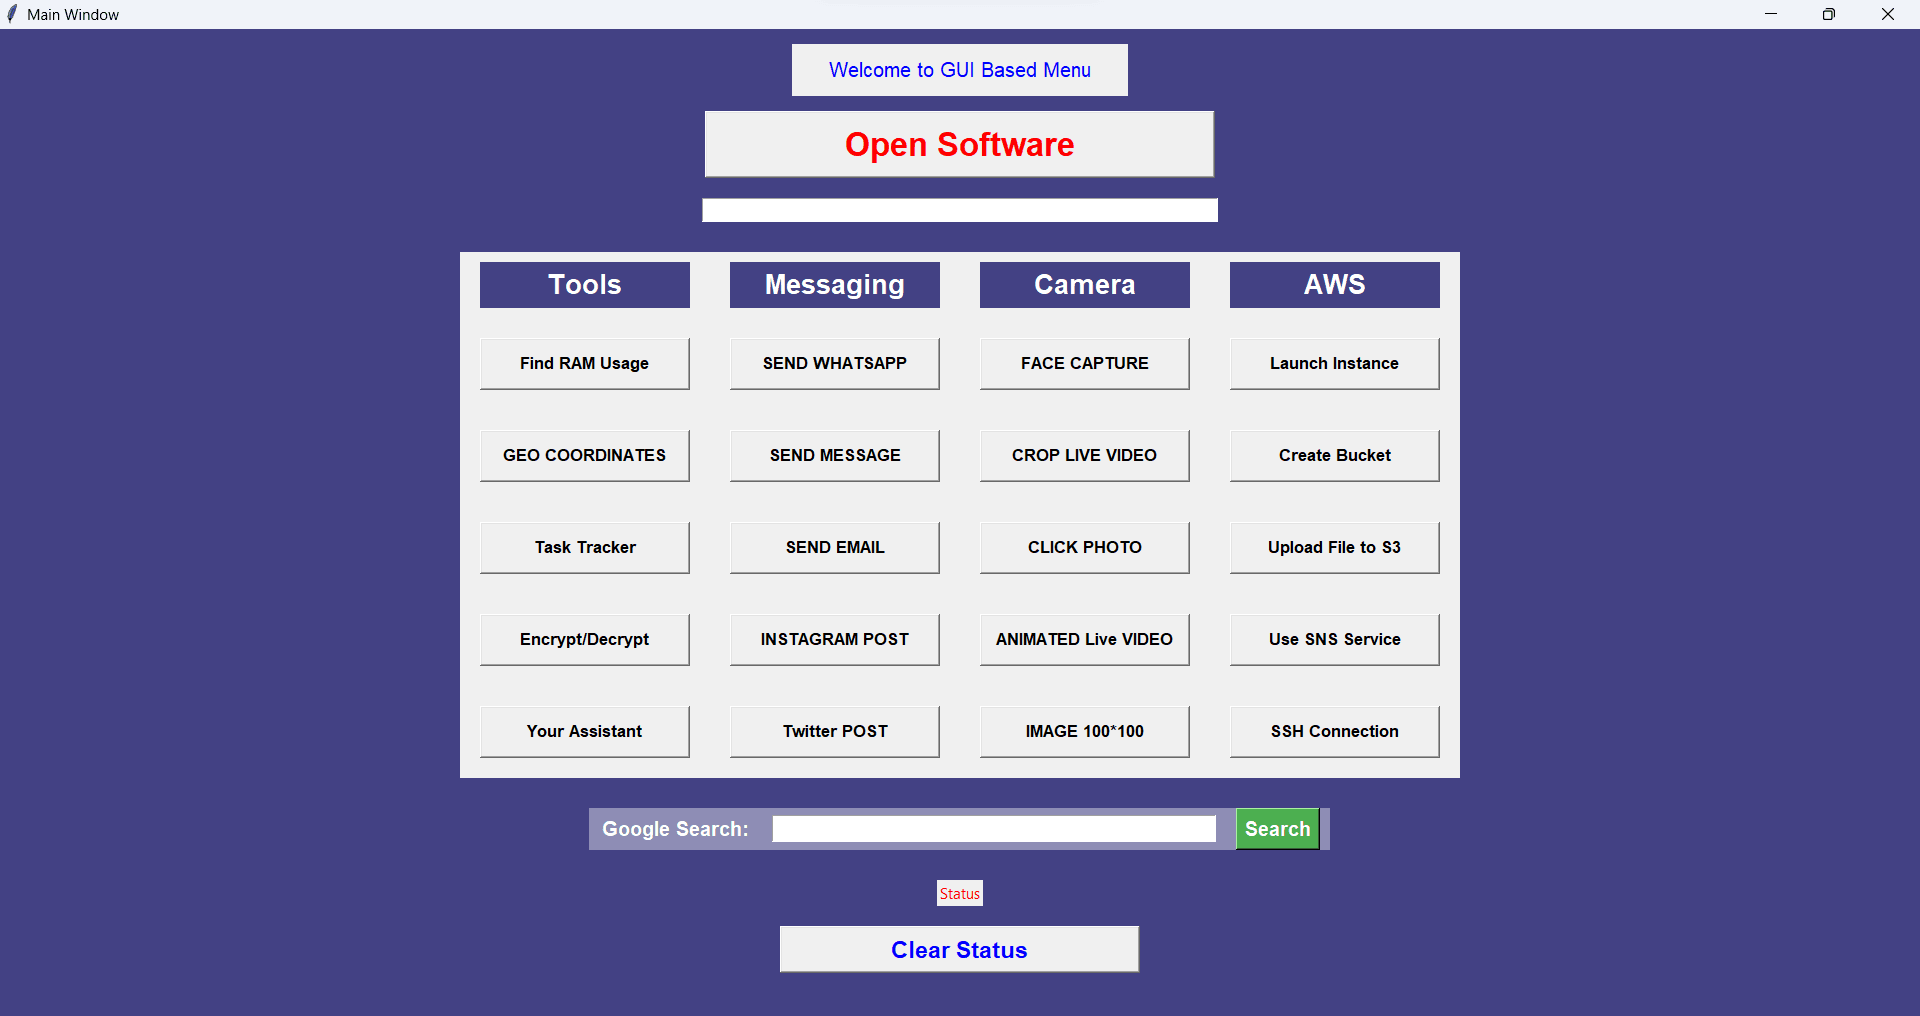
The project combines various Python libraries to create a versatile GUI application. Here are some of the key features:
-
Software Launcher: Open commonly used software applications with the click of a button.
-
Task Tracker: Manage your to-do list with a simple task tracker.
-
Tools: Access various tools, such as an encryption/decryption tool and a RAM usage finder.
-
Messaging: Send messages via WhatsApp, SMS, or email.
-
Camera: Capture photos, crop images, and record videos.
-
AWS Integration: Launch EC2 instances, create S3 buckets, and interact with Simple Notification Service (SNS).
Getting Started
Setting Up the Environment
To begin with, let's ensure that the necessary libraries are installed. The project utilizes several Python libraries for GUI development, AWS integration, messaging, and more. Ensure you have the following libraries installed:
pip install tkinter psutil paramiko Pillow twilio boto3 geopy opencv-python pywhatkit pyautogui pynput googlesearch-python
Import Statements
The script starts by importing several Python libraries and modules. Here's a brief explanation of each:
- tkinter: GUI toolkit for creating graphical interfaces.
- simpledialog, messagebox: Dialog boxes for user input and displaying messages.
- os: Provides a way of interacting with the operating system.
- json: Handles JSON (JavaScript Object Notation) data.
- datetime: Provides classes for working with dates and times.
- psutil: Retrieves information on system utilization (e.g., CPU, memory).
- paramiko: Implements the SSH protocol for secure communication.
- PIL (Python Imaging Library): Adds image processing capabilities.
- cv2 (OpenCV): Computer vision library for image and video processing.
- pywhatkit, pyautogui: Automation and interaction with applications.
- time: Functions for working with time.
- random: Generates random numbers.
- pynput.keyboard: Monitors and controls the keyboard.
- twilio.rest: Twilio API for sending SMS messages.
- boto3: AWS SDK for Python.
- geopy.geocoders: Converts addresses into geographic coordinates.
- ssl, smtplib, EmailMessage: Modules for sending emails.
- functools.partial: Creates partially initialized functions.
- googlesearch: Library for performing Google searches.
Once the environment is set up, we can proceed to create the main window for our GUI application.
Creating the Main Window
The main window serves as the central hub for our GUI application. It contains buttons that lead to different sections, each catering to specific functionalities. Let's create the MainWindow class in Python using the tkinter library.
import tkinter as tk
from tkinter import simpledialog, messagebox
# ... (other imports)

class MainWindow:
    def __init__(self, master):
        self.master = master
        master.title("Main Window")
        master.geometry("1200x900")
        master.configure(bg="#434184")

        # Additional code for creating buttons and setting up the main window
        # ...

# Main part of the script
if __name__ == "__main__":
    root = tk.Tk()
    app = MainWindow(root)
    root.mainloop()
In the above code, we've initialized the main window and set its title, size, and background color. The MainWindow class will evolve to include various sections and functionalities.
Adding Buttons
In this section, we'll create buttons for various tools such as RAM usage checker, encryption/decryption, task tracker, and more. Additionally, we'll integrate messaging services like WhatsApp, email, and AWS SNS.
# ... (previous code)

class MainWindow:
    def __init__(self, master):
        # ... (previous code)

        buttons_frame = tk.Frame(root)
        buttons_frame.pack(side=tk.TOP, pady=10)

        # ... (previous code)

        # Stylish headers and buttons in frames
        header1_frame = create_header_frame(buttons_frame, "Tools")
        header1_frame.grid(row=0, column=0, padx=20, pady=10, sticky="nsew")

        # ... (header frames for messaging, camera, AWS)

        # Additional buttons for the menu
        button_encrypt = create_button(buttons_frame, "Encrypt/Decrypt", EncryptionWindow)
        button_assistant = create_button(buttons_frame, "Your Assistant", AssistantWindow)
        button_coordinates = create_button(buttons_frame, "GEO COORDINATES", lambda: get_coordinates())
        button_task_tracker = create_button(buttons_frame, "Task Tracker", lambda: task_manager.create_to_do_window())
        button_ram = create_button(buttons_frame, "Find RAM Usage", command=lambda: show_result(f"RAM memory % used: {psutil.virtual_memory().percent}\nRAM Used (GB): {psutil.virtual_memory().used / 1000000000}"))

        # ... (other buttons for messaging, camera, AWS)

        # Create and pack the buttons
        button_ram.grid(row=1, column=0, padx=20, pady=20, sticky="nsew")
        button_coordinates.grid(row=2, column=0, padx=20, pady=20, sticky="nsew")
        button_task_tracker.grid(row=3, column=0, padx=20, pady=20, sticky="nsew")
        button_encrypt.grid(row=4, column=0, padx=20, pady=20, sticky="nsew")
        button_assistant.grid(row=5, column=0, padx=20, pady=20, sticky="nsew")

        # ... (other button placements for messaging, camera, AWS)
The create_button function helps create uniform buttons, and each button is associated with a specific command or window. The code is organized into sections for clarity and ease of understanding.
Tool Section
1. Encrypt/Decrypt
The EncryptionWindow class provides a graphical user interface for encrypting and decrypting text. It includes radio buttons for choosing between encryption and decryption, an entry widget for entering the text to be processed, and a button to initiate the process. The encryption and decryption logic involves manipulating the characters of the input text in a specific manner.
class EncryptionWindow:
    def __init__(self, parent):
        # Initialize UI components (radio buttons, entry, button)
        self.radio_var = Placeholder()
        self.entry_text = Placeholder()
        self.process_button = Placeholder()

    def encrypt_decrypt_logic(self):
        # Logic for encryption/decryption based on user choice
        if self.radio_var.get() == 'Encrypt':
            # Encryption logic
            encrypted_text = Placeholder()
            self.display_result(encrypted_text)
        else:
            # Decryption logic
            decrypted_text = Placeholder()
            self.display_result(decrypted_text)

    def display_result(self, result):
        # Display the result in a messagebox
        messagebox.showinfo('Result', result)
- User Interface: The class sets up a window with radio buttons, an entry widget, and a process button.
- Processing Logic: Depending on the user's choice (encryption or decryption), the corresponding method processes the input text accordingly.
- Encryption Logic: It involves rearranging and adding random characters to the input text.
- Decryption Logic: It involves reversing the encryption process.
2. Your Assistant
The PersonalAssistant class is responsible for acting as a basic personal assistant. It can set reminders, provide the current time, check reminders, and answer simple queries.
class PersonalAssistant:
    def __init__(self):
        # Placeholder for task list
        self.tasks = []

    def set_reminder(self, task, due_date):
        # Logic to set a reminder

    def get_time(self):
        # Logic to get and display the current time

    def check_reminders(self):
        # Logic to check and display due reminders

    def answer_query(self, query):
        # Logic to provide predefined responses
        response = Placeholder()
        return response
- Set Reminder: Users can set reminders by providing a task and due date.
- Get Time: It fetches and prints the current time.
- Check Reminders: It checks if any reminders are due based on the provided due date.
- Answer Query: It provides predefined responses for specific queries.
3. Geo Coordinates
The get_coordinates function prompts the user to enter a place name and uses the geopy library to fetch the geographical coordinates (latitude and longitude) of that place. The information is displayed in a messagebox.
from geopy.geocoders import Nominatim

def get_coordinates():
    # Get user input for place name
    place_name = simpledialog.askstring('Input', 'Enter a place name:')

    # Geocoding to obtain coordinates
    geolocator = Nominatim(user_agent="geo_coordinates_app")
    location = geolocator.geocode(place_name)

    # Display the coordinates in a messagebox
    messagebox.showinfo('Coordinates', f'Latitude: {location.latitude}, Longitude: {location.longitude}')
- User Input: The function uses
simpledialog.askstringto get the user's input (place name). - Geocoding: It utilizes the
Nominatimgeocoder to obtain coordinates based on the provided location name. - Display Results: The obtained coordinates are displayed using
messagebox.showinfo.
4. Task Tracker
The TaskManager class represents a to-do list application with features to add, remove, and display tasks. It interacts with a JSON file (tasks.json) to store task data persistently.
import json

class TaskManager:
    def __init__(self, parent):
        # Initialize UI components (listbox, entry, add/remove buttons)
        self.task_listbox = Placeholder()
        self.new_task_entry = Placeholder()
        self.add_button = Placeholder()
        self.remove_button = Placeholder()

        # Load tasks from JSON file
        self.load_tasks()

    def load_tasks(self):
        # Load tasks from 'tasks.json' file
        with open('tasks.json', 'r') as file:
            self.tasks = json.load(file)

    def save_tasks(self):
        # Save tasks to 'tasks.json' file
        with open('tasks.json', 'w') as file:
            json.dump(self.tasks, file)
- Create To-Do Window: It creates a to-do list window with a listbox for tasks, an entry widget for new tasks, and buttons to add and remove tasks.
- Load and Save Tasks: Tasks are loaded from and saved to a JSON file to maintain persistence.
- Add and Remove Tasks: Users can add new tasks, mark them as completed, and remove selected tasks.
5. Find RAM Usage
The find_ram_usage function utilizes the psutil library to retrieve and display information about RAM usage.
import psutil

def find_ram_usage():
    # Retrieve RAM information using psutil
    ram_info = psutil.virtual_memory()

    # Display RAM information in a messagebox
    messagebox.showinfo('RAM Usage', f'Used RAM: {ram_info.percent}% ({ram_info.used / (1024 ** 3):.2f} GB)')
- Retrieve RAM Information: It uses
psutil.virtual_memory()to get information about virtual memory usage. - Display Information: The percentage of used RAM and the amount of used RAM in gigabytes are displayed in a messagebox.
These tool functionalities provide a range of utilities, from handling personal tasks to system-related tasks like finding RAM usage. The graphical user interfaces enhance user interaction and make these features accessible within a user-friendly environment.
Messaging Section
In this section, we'll integrate messaging services, allowing users to send messages via WhatsApp, SMS, and email. We'll use the twilio library for WhatsApp and SMS functionalities and the smtplib library for email.
1. Sending WhatsApp Messages
def whatsapp():
    phone_number = simpledialog.askstring("WhatsApp", "Enter phone number:")
    if phone_number:
        try:
            pywhatkit.sendwhatmsg(phone_number, "Hello Linux World", time.localtime().tm_hour, time.localtime().tm_min + 1)
            time.sleep(20)
            pyautogui.click()
            time.sleep(5)
            pyautogui.press('enter')
            show_result("Message sent!")
        except Exception as e:
            show_error(str(e))
To send a WhatsApp message, the application prompts the user for a phone number using simpledialog.askstring.
The pywhatkit.sendwhatmsg function sends the message, including content and the current hour and minute.
After sending, the application waits for 20 seconds (time.sleep(20)) and simulates a click and 'enter' key press for confirmation.
If successful, it displays a confirmation message via show_result.
2. Sending SMS Messages Using Twilio
def message():
    client = Client("AC39df9b5371dgfgfgfg", "b3gdaghsjdmhd")
    client.messages.create(to="+955522122",
                           from_="+1412355555",
                           body="Hello Linux World!")
    print("message sent")
Twilio Client Initialization: - It initializes a Twilio client using the account SID and authentication token.
Sending SMS: - The client.messages.create method is used to send an SMS.
It includes the recipient's number (to), the sender's number (from_), and the message body (body).
After sending the SMS, it prints a message to the console indicating that the message has been sent.
3. Sending Email Messages
def Email():
    email_sender = 'your_email@gmail.com'  # Replace with your email
    email_password = 'your_password'  # Replace with your email password
    email_receiver = simpledialog.askstring("Email", "Enter your email:")

    if email_receiver:
        subject = 'Check out my email code'
        body = "Your email body here"

        try:
            em = EmailMessage()
            em['From'] = email_sender
            em['To'] = email_receiver
            em['Subject'] = subject
            em.set_content(body)

            context = ssl.create_default_context()
            with smtplib.SMTP_SSL('smtp.gmail.com', 465, context=context) as smtp:
                smtp.login(email_sender, email_password)
                smtp.sendmail(email_sender, email_receiver, em.as_string())

            show_result("Email Sent")
        except Exception as e:
            show_error(f"Email error: {str(e)}")
The function starts by prompting the user to enter their email address (email_receiver).
It sets up the email subject and body.
- Uses the
EmailMessageclass for email construction.
Sending Email: - It attempts to send the email using the SMTP_SSL method.
Displays a result message or an error message using show_result or show_error.
4. Posting on Instagram
def instagram_upload():
    username = "your_instagram_username"
    password = "your_instagram_password"

    bot = Bot()

    bot.login(username=username, password=password, use_cookie=False, ask_for_code=True)

    image_path = "captain.jpg"
    image = Image.open(image_path)
    width, height = image.size
    min_dimension = min(width, height)
    resized_image = image.crop((0, 0, min_dimension, min_dimension))

    temp_image_path = "temp.jpg"
    resized_image.save(temp_image_path)

    caption = "Check out this cool picture!"

    try:
        bot.upload_photo(temp_image_path, caption=caption)
        show_result("Image uploaded to Instagram successfully!")
    except Exception as e:
        show_error(f"Instagram upload error: {str(e)}")
The function starts by initializing Instagram credentials (username and password).
It processes the image to make it square.
Uploading Image to Instagram: It attempts to upload the image to Instagram using the Bot class.
Displays a result message or an error message using show_result or show_error.
5. Tweeting on Twitter
The application allows users to post tweets on Twitter. The relevant function is:
def tweet():
    consumer_key = 'your_consumer_key'
    consumer_secret = 'your_consumer_secret'
    access_token = 'your_access_token'
    access_token_secret = 'your_access_token_secret'

    auth = tweepy.OAuthHandler(consumer_key, consumer_secret)
    auth.set_access_token(access_token, access_token_secret)

    api = tweepy.API(auth)

    tweet_content = "Just posted a tweet using my Python application! #Python #Coding"

    try:
        api.update_status(tweet_content)
        show_result("Tweet posted successfully!")
    except tweepy.TweepError as e:
        show_error(f"Twitter error: {str(e)}")
The function starts by setting up the Twitter API Credentials.
Tweet Content: It defines the content of the tweet.
Posting Tweet on Twitter: It attempts to post the tweet on Twitter using the api.update_status method.
Displays a result message or an error message using show_result or show_error.
Camera Section
The Camera section focuses on integrating functionalities related to capturing images and videos using the device's camera. We'll use the OpenCV library for these operations.
1. Capture Photo Function:
def click_photo():
    cap = cv2.VideoCapture(0)
    status, photo = cap.read()
    cv2.imwrite("captured_photo.jpg", photo)
    cv2.imshow("Captured Photo", photo)
    cv2.waitKey(5000)
    cv2.destroyAllWindows()
    cap.release()
- Utilizes the OpenCV library to capture a photo from the default camera (camera index 0).
- Saves the captured photo as "captured_photo.jpg" using
cv2.imwrite. - Displays the captured photo using
cv2.imshowand remains visible for 5 seconds (cv2.waitKey(5000)) before closing. cap.release()releases the camera capture.
2. Crop Photo Function:
def crop_pic():
    cap = cv2.VideoCapture(0)
    status, photo = cap.read()
    cv2.imwrite("captured_photo.jpg", photo)
    cv2.imshow("Original Photo", photo)
    cropped_photo = photo[200:540, 200:430]
    cv2.imshow("Cropped Photo", cropped_photo)
    cv2.waitKey(5000)
    cv2.destroyAllWindows()
    cap.release()
- Captures a photo similarly to
click_photo. - Displays the original photo and then crops it to a specific region defined by
photo[200:540, 200:430]. - The cropped photo is displayed separately before closing after 5 seconds.
3. Capture Video Function:
def capture_video():
    cap = cv2.VideoCapture(0)
    while True:
        status, photo = cap.read()
        cv2.imshow("Live Video", photo)
        if cv2.waitKey(5) == 13:  # Press 'Enter' to exit the loop
            break
    cv2.destroyAllWindows()
    cap.release()
- Captures live video from the default camera.
- Displays the live video using
cv2.imshowand continues until the 'Enter' key is pressed, which breaks the loop.
4. Capture and Crop Video Function:
def capture_crop_video():
    cap = cv2.VideoCapture(0)
    while True:
        status, photo = cap.read()
        photo[0:200, 0:200] = photo[200:400, 200:400]  # Copy a region to another region
        cv2.imshow("Live Video with Cropping", photo)
        if cv2.waitKey(5) == 13:  # Press 'Enter' to exit the loop
            break
    cv2.destroyAllWindows()
    cap.release()
- Captures live video and performs real-time cropping by copying one region of the frame to another.
- The live video with cropping is displayed using
cv2.imshowand stops when the 'Enter' key is pressed.
5. Image Processing Function (100x100 Image):
def image_100_100():
    width, height = 800, 600
    image = Image.new("RGB", (width, height), (255, 255, 255))
    draw = ImageDraw.Draw(image)
    # ... (code for creating a patterned image)
    image.save("indian_flag.png")
    image.show()
- Utilizes the Pillow library (Image and ImageDraw) to create an image with a specific pattern.
- Saves the created image as "indian_flag.png" and displays it using
image.show().
6. Animated Live Video Function:
def animated():
    # ... (code for importing libraries and defining cartoonize functions)
    def cartoonize_video():
        # ... (code for capturing and displaying cartoonized video)
    if __name__ == "__main__":
        cartoonize_video()
- Introduces cartoonizing live video using OpenCV and other relevant libraries.
- Defines the
cartoonize_videofunction, which captures live video and displays both the original and cartoonized frames side by side. - The cartoonizing effect is achieved using a combination of grayscale, edge detection, and color filtering.
This section of the code demonstrates the integration of computer vision and image processing techniques using OpenCV and Pillow libraries for various camera-related functionalities. The functions enable users to capture photos, crop images, record live videos, and apply image processing effects.
AWS Section
The AWS section of the code includes functionality related to Amazon's cloud services. Let's break down the AWS-related functions and classes:
1. Launching EC2 Instances
def launch_instance():
    region = 'ap-south-1'

    instance_name = simpledialog.askstring("Instance Name", "Enter instance name:")

    if instance_name:
        ec2_client = boto3.client('ec2', region_name=region)
        response = ec2_client.run_instances(
            ImageId='ami-0da59f1af71ea4ad2',
            InstanceType='t2.micro',
            MaxCount=1,
            MinCount=1,
            TagSpecifications=[
                {
                    'ResourceType': 'instance',
                    'Tags': [
                        {
                            'Key': 'Name',
                            'Value': instance_name
                        },
                    ]
                },
            ]
        )

        instance_id = response['Instances'][0]['InstanceId']
        messagebox.showinfo("Instance Launched", f"Instance '{instance_id}' launched successfully!")
    else:
        messagebox.showwarning("Instance Launch", "No instance name provided.")
- Prompts the user to enter the name for a new EC2 instance.
- Uses the
boto3library to interact with AWS services. - Launches an EC2 instance with specific parameters, including the AMI ID and instance type.
- Tags the instance with the provided name.
- Displays a success message using
messagebox.showinfo.
2. Creating S3 Buckets
def create_bucket():
    bucket_name = simpledialog.askstring("Bucket Name", "Enter bucket name:")
    if bucket_name:
        s3_client = boto3.client('s3', region_name='ap-south-1')
        s3_client.create_bucket(
            Bucket=bucket_name,
            ACL='private',
            CreateBucketConfiguration={
                'LocationConstraint': 'ap-south-1'
            }
        )
        messagebox.showinfo("Bucket Created", f"Bucket '{bucket_name}' created successfully!")
    else:
        messagebox.showwarning("Bucket Creation", "No bucket name provided.")
- Allows the user to create an S3 bucket by entering a unique bucket name.
- Uses the
boto3S3 client to create the bucket with the specified name and configuration. - Displays a success message using
messagebox.showinfoif the bucket creation is successful.
3. Uploading Files to S3
def upload_file():
    object = boto3.client('s3')
    object.upload_file(r"C:\Users\asus\Pictures\captain america\captain.jpg",'ka12','pics')
    download_object = boto3.client('s3')
    download_object.download_file('ka12','pics', 'captain.jpeg')
- Demonstrates uploading a file to an S3 bucket using the
boto3S3 client. - Calls the
upload_filemethod with the local file path, bucket name, and destination key. - Shows an example of file download using
download_fileto retrieve the uploaded file.
4. Using SNS (Simple Notification Service)
def use_sns_service():
    sns = boto3.client('sns',region_name='ap-south-1')
    sns.publish(
    Message='Dont take it serious.',
    Subject='this is automatd sns service.',
    TopicArn='arn:aws:sns:ap-south-1:299592517672:python_menu'
    )
    print("email sent")
- Uses the
boto3SNS client to publish a message to a specified topic ARN in the Simple Notification Service (SNS). - Displays a success message by printing to the console.
These functionalities leverage the boto3 library to interact with AWS services programmatically. Proper error handling and user prompts enhance the usability of these features in the graphical user interface.
Conclusion
This project demonstrates the capabilities of Python and Tkinter in creating a versatile and interactive GUI-based menu. Users can perform a wide range of tasks, from managing their to-do lists to interacting with AWS services and capturing photos.
The combination of libraries such as OpenCV, Pillow, Paramiko, Twilio, and Boto3 enhances the functionality of the application, making it a powerful tool for various tasks.
Feel free to explore and modify the code to add more functionalities or customize the interface according to your preferences. Happy coding!